Tuesday 20 February 2018

Home-made Ice cream, from scratch.

Hello friends <3  We are going to witness the making of Vanilla Ice-cream, from scratch.  One of our viewers have requested for the same in our Facebook page, and this recipe is dedicated to her.  The most common ingredients used are Condensed milk and whipping cream.  I have tried recipes from Youtube videos that suggests almost equal parts of these both for this dessert.  Often, these were too sugary and I had to thrown them away to the bin.  Finally I gave a try to two parts whipping cream to one part of condensed milk and this ratio worked like a charm.
 
Yesterday we had a few guests at my home, so I had prepared a good amount of vanilla ice-cream with Dairy whipping cream.  They were not only smooth and delicately textured, but also had a rich, milky taste to them.  All the credits goes to my Almarai dairy cream which whipped like a charm.  


Now, off to our recipe.  I will mention cup measurements, as you guys find them easier to deal with.  My cup has 200 ml capacity, and the ingredients needed are 
  • 13/4 cup or 300 grams of Almarai whipping cream
  • 1/2 cup + 1 tbsp Icing sugar (You can skip sugar if you are using Non-dairy/sweetened cream)
  • 3/4 cup or 150 grams of Nestle condensed milk
  • 1 tbsp Vanilla extract 
This recipe utilizes proper whipping of cream till stiff peaks comes, for those who are new to this cream  or find them unavailable at your place, don't worry I will drop a few links  for Dairy/Non-dairy/Instant cream.  Depending upon the availability, you  could use them in the recipe.

Whipped cream from Dairy cream

Whipped cream from Amul tetrapack

Whipped cream from Non-Dairy cream like Tropolite

Whipped cream from Commercial Powder like Bluebird

This recipe utilizes three main steps, for your conveniance I have included a video.  Please watch them after reading every step.  This could help you to understand how they are made.

STEP 1 - Chill your whipping cream and beater blades for minimum of three hours.  Pour your dairy cream to the blender.  Add in Icing sugar and vanilla.  Keep them beating, and gradually increase the speed.

STEP 2 - Whip them till they get beautiful stiff peaks.  In the video, I have shown you a close-up look of how stiff peaks looks like.  You could also go through some of my links above, that gets you step-by-step pic of how stiff peaks are achieved.

STEP3 - Add condensed milk and beat them on highest speed for not more than 5-7 seconds.  You will note that they have turned soft, transfer this mixture in a plastic container and freeze for a minimum of 6 hours.  After that, you could scoop them in and enjoy.

 I just added dark chocolate syrup (2 parts of dark chocolate with 1 part of cream and heat them on a double boiler till chocolate melts)  with a touch of sprinkles.  You could serve them plain as well, it will be very tasty. 


This is the basic version, you could also add on your own flavors like Coffee, Chocolate/Chocolate chips, Butterscotch etc.  Do try them at home and let us know how it turned out.  Good day to all <3

Friday 10 March 2017

Whole wheat crackers

Hi friends, we often munch on cheese crackers - what if we can replicate them home-styled and healthier as well?  Yes, we can!  When I came across the texanerin site, I could hardly resist these without a try.  If you kids like cheese, they may end up liking these crackers as well.  They are whole-wheat based and can be an ideal snack box option.  


After baking, they were crunchy and had a peppery taste.  You can play with spices and bring out your own flavours as well.  So, yes do try and let us know your feedback.  

Ingredients required

  • 170 gram grated Cheddar Cheese
  • 50 grams unsalted Butter, melted
  • 100 grams of Wheat flour
  • 1/2 tsp salt
  • 1/2 tsp pepper


Method

Add flour, salt, pepper and cheddar cheese in a dry bowl.  


Add in melted butter and mix them well. 


Now knead this using hands into a tight dough.  Let it rest for 10 minutes. Meanwhile pre-heat the oven to 180 degree celsius.  


Roll them to  a sheet of 1/8 inch thickness.


Cut them into thin strips vertically.  


Repeat the same horizontally.  


Using a wooden dowel, prick a hole in centre of each square, this helps in non-rising of crackers during baking.


Bake them for about 10 minutes till they turn brown around the edges.  For ultra thin crackers, make sure you roll the dough with equal thickness.


Cool them on wire rack.  Store them in air-tight container


Happy Baking  :)


Wednesday 18 January 2017

Chocolate Caramel cupcakes

Chocolate is an all time favorite flavor.  Having made caramel sauce earlier, I regretted each day to let it sit idle.  That's when I came up with these Chocolate cupcakes.  These are so soft and moist that they literally melt in your mouth, even when had straight from the refrigerator. These are eggless as well.


CHOCOLATE + CREAM + CARAMEL = HEAVEN!
Need I say more <3  <3

Ingredients required

For chocolate cupcakes
Dry ingredients

  • 1/2 cup All purpose flour
  • 1/2 cup caster sugar
  • 1/4 cup cocoa powder
  • 1/2 tsp Baking powder
  • 1/2 tsp Baking soda
  • 1/4 tsp salt

Wet ingredients

  • 1/4 cup milk
  • 2 tbsp curd
  • 1/4 cup oil
  • 1/2 tsp vanilla essence

others

  • 1/2 tsp instant coffee powder
  • 1/4 cup of hot boiling water
Topping

Method


Pre-heat the oven to 180-degree celsius.  Take your wet and dry ingredients in two separate bowls.  Sieve dry ingredients once and give them a good stir.


Make a well in the center of dry ingredients and add in our wet ingredients.  


Whisk them gently to combine.  In a separate bowl or cup, mix hot water with coffee.  Add this hot coffee to our batter and whisk them vigorously for a minute.  


And our batter is ready!  I poured them on 11 small cupcake liners


Bake them for fifteen minutes.


TA-DA our cupcakes are ready, let them cool completely for about an hour. 


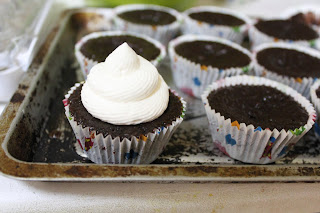
Meanwhile, I attached my nozzle to Icing bag and filled them with cream using the  spatula.


Giving them a gentle squeeze, I got a beautiful swirl on the top of each cupcake.  Note that the cupcake should not be warm if it was cream will melt right away and won't hold its shape.


After swirling, melt few teaspoons of salted caramel and using a spoon, gently drizzle on the top of iced cupcakes.  


Enjoy!


Happy Baking <3  <3


How to make Salted Caramel sauce, from scratch

How I love the caramel sauce topping on Vanilla Ice cream!    Caramel sauce is done by mixing caramelized sugar with cream.  They are used on toppings of many desserts like creme caramel, flan, pudding, frosted cupcakes etc.  Making them, at home requires careful attention.


Safety precautions, like maintaining a considerable distance from stove-top or wearing gloves is advisable since there are chances of coming in contact with very hot sugar.  But, with little caution and attention - you can make these beauties in less than 30 minutes!

I have written this post with pics, if you have any queries- please feel free to post in the comment section.  If you are a beginner, do read our tips at the end to achieve this godly sauce.  <3

Ingredients required


  • 100 grams of caster sugar
  • 1/2 tsp salt
  • 45 grams of unsalted butter (If you are using salted butter, you can skip adding salt)
  • 1/4 cup of Dairy cream (I used Saudia brand)


Method

Please keep all the ingredients handy.  In a deep and dry saucepan, add the sugar in a simmer flame.  Let the sugar melt on its own.


Please don't wander off, keep a close watch.  Don't stir.   You can tilt the pan, though if you find the sugar to be melting unevenly.  


As we find the sugar melts and slowly is turning into golden amber color.  


Sugar is completely melted and caramelized into a lovely golden brown color. Now add in salt.  


Add in butter cubes as well, and stir them up with a wooden spoon.  


After stirring, add in the cream.  As you add in cream, it may steam up or bubble up, so be careful.  Also, the cream should be in warm condition when you add.  One suggestion is that you may heat them up alternatively when you get all the sugar melted so that by the time you add the cream, it is warm.  


See how it splutters or bubbles.  If you find clumps of caramel, undissolved in cream, don't worry keep on stirring you will get a clear sauce.  


See, how I got a clear sauce.  Switch off the gas.  


I placed them in an air-tight container and refrigerated them.  There are times when you find your sauce to be too runny or too hard.  If you find them runny, you can reduce them in a saucepan.  If found too hard, you can heat them up with a tsp of cream to get the correct consistency. 


Happy cooking :D  :D  

Whipped cream from Dairy whipping cream.

       Hi friends, today's post is about Dairy whipping cream and how to whip them correctly to get those beautiful STIFF peaks.  Though lots of people prefer non-dairy version over dairy, because of the stability the former offers, nothing can beat the delicious taste of Dairy whipped cream.  I already have posted whipped cream from Amul tetrapack.  Likewise, for Instant cream from powder and non-dairy cream.  Please feel free to check those links.  I have included step-by-step pics for the cream, and yes look at those beautiful swirls below, aren't they gorgeous?  <3  <3


When it comes to Baking, it is a constant practice that leads us to a mouth-watering treat.  And yes, when I first made a batch, I flopped.  Following which, I made my second batch to get those beautiful swirls.  I have included my flopped attempt in my content as well so that you guys can be cautious and need not repeat the same.  


Dairy whipping cream - attempt#1


Ingredients used are
1/2 cup of Dairy cream (I used Saudia brand)
2 tbsp caster sugar

Before whipping cream, I refrigerated my bowl and blades for an hour.  In the chilled bowl, I added the cream.


And yes started to whip, whip and whip.


After a minute or two, gradually I added sugar while beating.  


After the sugar got over, my whipping continued for few minutes, but there was no sign of stiff peaks.  


The blades when taken out, went flat indicating no peaks.  I had no other way than to discard this batch and start fresh.


Dairy whipping cream-  attempt#2

This attempt, I ran out of time, so instead of refrigerating bowl, I froze them for 15 minutes.  But, please be patient enough to refrigerate the bowl for a minimum of 4-5 hours.

Ingredients I used are
3/4 cup of Dairy whipping cream (I used Almarai brand)
1/4 cup of icing sugar
1 tsp of vanilla essence

I added all three ingredients in a bowl and along with blades, I froze them for 15 minutes/


Wrapped the bowl with foil and this goes into the  freezer.


After 15 minutes, remove the foil and start to beat.


Within 3 minutes, I got beautiful stiff peaks, see the blades when removed gives us stiff peaks.


And yes, one more test is that if you tilt the bowl upside down, the cream should not fall down.


Yayy.... I nailed it.  


DON'T USE THE CREAM RIGHT AWAY TO PIPE.  Refrigerate them for an hour at least before piping.  And yes, look at that beautiful swirl.


So, what went wrong in my first batch.  I could come up with following reasons
  1. My bowl and blades were not chilled properly, it's best to refrigerate them overnight.  Temperature plays a crucial role.
  2. Icing sugar helps in stability way better than regular granulated sugar does. 
  3. During my first attempt, I used a regular dairy cream.  During my Second attempt, I bought a Dairy whipping cream, so the specification of the cream also should matter.

Once you make them, you will fall in love with the milky taste of this cream.  Please feel free to drop your comments and I hope you do try them at home.  

nRelate Posts Only