Showing posts with label Whipped cream. Show all posts

Wednesday, 18 January 2017

Chocolate Caramel cupcakes

Chocolate is an all time favorite flavor.  Having made caramel sauce earlier, I regretted each day to let it sit idle.  That's when I came up with these Chocolate cupcakes.  These are so soft and moist that they literally melt in your mouth, even when had straight from the refrigerator. These are eggless as well.


CHOCOLATE + CREAM + CARAMEL = HEAVEN!
Need I say more <3  <3

Ingredients required

For chocolate cupcakes
Dry ingredients

  • 1/2 cup All purpose flour
  • 1/2 cup caster sugar
  • 1/4 cup cocoa powder
  • 1/2 tsp Baking powder
  • 1/2 tsp Baking soda
  • 1/4 tsp salt

Wet ingredients

  • 1/4 cup milk
  • 2 tbsp curd
  • 1/4 cup oil
  • 1/2 tsp vanilla essence

others

  • 1/2 tsp instant coffee powder
  • 1/4 cup of hot boiling water
Topping

Method


Pre-heat the oven to 180-degree celsius.  Take your wet and dry ingredients in two separate bowls.  Sieve dry ingredients once and give them a good stir.


Make a well in the center of dry ingredients and add in our wet ingredients.  


Whisk them gently to combine.  In a separate bowl or cup, mix hot water with coffee.  Add this hot coffee to our batter and whisk them vigorously for a minute.  


And our batter is ready!  I poured them on 11 small cupcake liners


Bake them for fifteen minutes.


TA-DA our cupcakes are ready, let them cool completely for about an hour. 


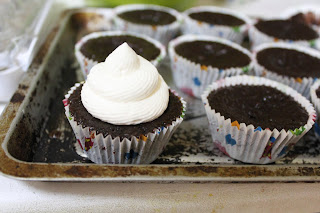
Meanwhile, I attached my nozzle to Icing bag and filled them with cream using the  spatula.


Giving them a gentle squeeze, I got a beautiful swirl on the top of each cupcake.  Note that the cupcake should not be warm if it was cream will melt right away and won't hold its shape.


After swirling, melt few teaspoons of salted caramel and using a spoon, gently drizzle on the top of iced cupcakes.  


Enjoy!


Happy Baking <3  <3


Whipped cream from Dairy whipping cream.

       Hi friends, today's post is about Dairy whipping cream and how to whip them correctly to get those beautiful STIFF peaks.  Though lots of people prefer non-dairy version over dairy, because of the stability the former offers, nothing can beat the delicious taste of Dairy whipped cream.  I already have posted whipped cream from Amul tetrapack.  Likewise, for Instant cream from powder and non-dairy cream.  Please feel free to check those links.  I have included step-by-step pics for the cream, and yes look at those beautiful swirls below, aren't they gorgeous?  <3  <3


When it comes to Baking, it is a constant practice that leads us to a mouth-watering treat.  And yes, when I first made a batch, I flopped.  Following which, I made my second batch to get those beautiful swirls.  I have included my flopped attempt in my content as well so that you guys can be cautious and need not repeat the same.  


Dairy whipping cream - attempt#1


Ingredients used are
1/2 cup of Dairy cream (I used Saudia brand)
2 tbsp caster sugar

Before whipping cream, I refrigerated my bowl and blades for an hour.  In the chilled bowl, I added the cream.


And yes started to whip, whip and whip.


After a minute or two, gradually I added sugar while beating.  


After the sugar got over, my whipping continued for few minutes, but there was no sign of stiff peaks.  


The blades when taken out, went flat indicating no peaks.  I had no other way than to discard this batch and start fresh.


Dairy whipping cream-  attempt#2

This attempt, I ran out of time, so instead of refrigerating bowl, I froze them for 15 minutes.  But, please be patient enough to refrigerate the bowl for a minimum of 4-5 hours.

Ingredients I used are
3/4 cup of Dairy whipping cream (I used Almarai brand)
1/4 cup of icing sugar
1 tsp of vanilla essence

I added all three ingredients in a bowl and along with blades, I froze them for 15 minutes/


Wrapped the bowl with foil and this goes into the  freezer.


After 15 minutes, remove the foil and start to beat.


Within 3 minutes, I got beautiful stiff peaks, see the blades when removed gives us stiff peaks.


And yes, one more test is that if you tilt the bowl upside down, the cream should not fall down.


Yayy.... I nailed it.  


DON'T USE THE CREAM RIGHT AWAY TO PIPE.  Refrigerate them for an hour at least before piping.  And yes, look at that beautiful swirl.


So, what went wrong in my first batch.  I could come up with following reasons
  1. My bowl and blades were not chilled properly, it's best to refrigerate them overnight.  Temperature plays a crucial role.
  2. Icing sugar helps in stability way better than regular granulated sugar does. 
  3. During my first attempt, I used a regular dairy cream.  During my Second attempt, I bought a Dairy whipping cream, so the specification of the cream also should matter.

Once you make them, you will fall in love with the milky taste of this cream.  Please feel free to drop your comments and I hope you do try them at home.  

Saturday, 30 April 2016

Mango and Mint Meringue Mess

   Mango and Mint Meringue Mess is an summer-time refreshing dessert.  They are layered with freshly cut fruits with whipped cream and crumbled meringue.  The meringue offers an beautiful crunch needed for this dessert.


This dessert, is originally adapted from Eton Mess, an English dessert which has berries topped with cream and meringue.  Since this summer has started with Mango outburst,  I have used an liberal chops of those instead of Berries.


I have never guessed that Mango and Mint will blend each other beautifully.  This dessert is best had, as soon as they are assembled.  As they have meringue bits, and they tend to get soggy, the more they soak with mango and cream.  So, just have these soon after they get assembled.   I will suggest to prepare the meringue one day before hand, because it gets easier to assemble them.  

Sunday, 21 December 2014

Choco cake bars

    Well, wondering what to do with left-over cake and frosting after an grand baking session?  Well, this might be the answer for all ;)  With an glossy chocolate finish, this choco cake bars, will excite anybody and create an new demand with the left-overs  :)


Yes, after the Rainbow ruffle cake, I had some left-over cake (remember? I had cut the dome part) and the frosting too.  Initially I freezed them both for later use.  Now, when I wanted to make an dessert out of them, all I could think was of some cake pops.


But, with presence of ice-cream sticks all over my place, I could end up with this choco cake bars, ie an cakey version of chocobar.  Initially, cake crumbs were mixed with frosting and shaped over the ice-cream sticks.  This was layered with whipped cream and another layer of hot dark chocolate.  Final touch of rainbow sprinklers were added to glam up.


 Each and every bite was like amazing, the moistened cake with soft cream and cracking chocolate had compensated each other very well.  My man was, like initially startled to find them, when he opened the refrigerator.  Later, I explained him, that it was glamed up cake balls, and he happily reached out to pick one.  :) 

Tuesday, 16 December 2014

Rainbow ruffle cake

Initially, when I took to baking, I would search all types of cakes available online.  The one cake, which would impress me the most is this rainbow cake.  For long, I had been thinking of making this and surprising my kid, but as routine life goes on -this cake remained as an sweet memory inside my heart.  Now, when Swathi Iyer  and Julie announced this month's challenge, I almost jumped with joy! Yes, the challenge to bake my sweet-heart cake!


This cake needs an lot of patience, to bake each layer and also to assemble them.  I flavoured green layer with pista, red with strawberry  (which went according to the recipe source provided) and orange, yellow went with orange and mango fruit juices.  Rest I made as plain sponge and coloured them.


As soon, I started assembling them, I could see an huge tower of cake, to be feasted.  :)  I used Tropolite cream for frosting.


Each and every slice was delecious with whipped cream frosting.  As expected, my kid was very excited.  :)  At the end, that is all what every baker wants, to get amazed by their pretty hero's and heroine's of their life, isn't it?  :)


All thanks to Swathi Iyer  and Julie , this challenge was amazing and I am eagerly looking forward to another one!


Saturday, 22 November 2014

How to make vegan whipped cream - from Tropolite

    Hi guys, today we are going to see a 'vegan version' of whipped cream in our post.  I have also posted dairy whipped cream, and instant whipped cream before.   Now, with a more prevailing vegan culture at our place, this cream not only makes a huge reach but also restores same delicious taste as any regular dairy cream.


There are many brands of non-dairy whipped cream, but Tropolite is best.  At Hyderabad, I bought them at Balaji grand bazaar.  The best feature with Tropolite is that you need not flavor them with essence nor do you need to add sugar.  Everything is pre-packed and all you need to do is to whip them up!  Isn't it cool?   And yes, just like instant noodles, you need only TWO  minutes to whip them up.  Let's get started :)

Tuesday, 15 July 2014

Fruity shortcake


According to wiki, Shortcakes are crumbly bread that is leavened by baking powder.  Not only do they differ in size to regular cakes, but their method of preparation resembles like that of an bread/muffins.   The liquid ingredients used to moisten the dry ingredients are milk/cream,  resulting in crumbly-textured dough, which is shaped as desired and baked.  The baked ones are then, garnished with whipped cream along with fruit & fruit juices.  


So, when such gorgeous short-cakes were, suggested as this month's Baking partners challenge, I could hardly resist myself from trying them.  All thanks to Reeni and Swathi Iyer, for this awesome challenge.  I made this, and my family relished whole-heartedly. 

How to make whipped cream - from commercial powder

     Yes, in this post, I will explain how to whip up an delecious cream, from instant powder.  One magic of this whipped cream is not only that it is instant, but, requires exactly three minutes to prepare.  You can even prepare them the day before, trust me, this can  do wonders to your cake.

All you need is Whipped cream - instant topping (I used BLUE BIRD - 50 gm) and 90ml of ice-cold water.


Refrigerate the vessel (into which you are about to whip) and blender blades for atleast an hour.  Dissolve powder with water and begin to whip.  First minute the liquid will slowly rise to top.  Second minute, you can see lovely curls which swings according to the direction you are whipping and by the end of third minute, you can detect soft, fluffy frosting which has expanded almost, thrice in volume, forming stiff peaks over the blender


As soon as you get  this stage, cover them with cling wrap and refrigerate atleast fifteen minutes, before you use them for frosting.  This will yield you 11/2 cups of frosting.


Happy cooking :)


Saturday, 5 April 2014

Whipped cream - From Amul tetrapack

Whipped cream is essential in any baking.... sandwich them between cake, pastry or top in your favourite puddings, trifle... this cream enriches every dessert  :P  Though they are also made from non-dairy cream (which is far less expensive and requires lesser time to whip), the latter's  reduced reach or availability makes it an tougher part to execute.

Though, whipped cream is said to be undone with tetra packs due to those  interrupting stabilizers , separating the liquid cream from solid one helps us to recover from the same, also increasing the fat content in the cream.  I just went through the fact, when I had an glance at Nita Mehta's Cakes and Cake Decorations. She has clearly explained that separating liquid cream, and whipping up the solid one might result in good outcome and all thanks to her, it did :D


So, here comes the mighty solution for all-time-bakers.....

You will be needing 200 ml of Amul fresh cream, 2 tbspn of castor sugar (or icing sugar)

Do not shake the Cream, refrigerate for minimum two hours.  Open the Amul Fresh Cream pack, and separate the creamy part, reserve liquid in separate bowl (You can use liquid cream for cooking purpose)


And this creamy part is placed below ice-bath (an large bowl filled with ice-cubes)  and we start to whip using electric blender.  


After five minutes, when volume almost doubles, add icing sugar and continue to whip.


It will take another ten to twelve minutes, and there you get nice stiff peaks.


Aren't they lovely??


DO NOT OVERBEAT THEM, as there are chances of butter separating from the mixture.  Use them as such.  If you want to store, freeze.


nRelate Posts Only